Friday, December 17, 2010

There Was Nothing I Could Do to Stop It


My boy done growed up.
Happy Birthday, Ezra, my love. I told you you could never get any older than four...and here you are turning five. The age that signifies the beginning of independence. The age that you'll be when you trot off to school without a backward glance. The age where I must begin to let go. I'll let you go...but only if you promise to always come back to me : ) Sure do love you, kiddo.We're spending the day at Uncle Mike's memorial service...but Ezra will still get to party sometime next week. He's being very grown up about the whole situation. Thank you all for your prayers and sweet comments about Uncle Mike. The family really feels your love. And underneath are the everlasting arms--truly.

Sunday, December 12, 2010

Uncle Mikey

This morning the Lord called another one of His own Home. The loved one happened to be my Uncle Mike. Our family is in shock. We were not expecting this at all. We would appreciate the prayers of our loved ones that the Lord will comfort and keep each of us. Uncle Mike is survived by wife Pam, 5 children, 3 grandchildren, his mother Eva, his two brothers Terry (my dad) and Mark and sister Cindi. He joins his father and older brother with the Lord.
We sorrow, but not as those without hope for we know we will see Uncle Mike again in Heaven at the Great Reunion. You can see him too--if you are washed in the blood of the Lamb.
Uncle Mike was probably my kids' favorite great-uncle. He never missed an opportunity to hold them or play with them when we were around. Just recently he spent a large portion of his day playing with Ezra and Caroline while my Grandma was babysitting them. I heard stories about how much fun they had the whole drive home and then some. He lived far from his grandchildren and yet the time they spent with him will never be forgotten, I'm sure. He's not a hands-off Grandpa. We already miss you Uncle Mikey.
"The Lord giveth and the Lord taketh away; blessed be the name of the Lord."

Wednesday, December 8, 2010

Cookies With Aunt Ginger


Yesterday we had the privilege of going to a dear friend's house for some fun. She invited several children and their mommies to come decorate cookies. Ezra talked the whole way about how all the girls would play with the girl toys together and he and Uncle Jim would play with the big trucks together. He was thinking he'd be the only boy there...but he had a surprise waiting for him, Uncle Jim's great-grandson was invited as well.Commence decorating!


The little girls crawled around the floor hoping for dropped candies.

The kids were kept very busy for a long time.Ezra's decorating technique involved piling on as much candy as he could and then sealing it all in with lots of frosting. They look quite unique.

Caroline's cookies.
Little boys + big noisy trucks = a LOT of fun.

Uncle Jim is one of Nora's favorite people. She likes it a lot when he sings to her. He is singing "Blessed Assurance" in this picture.
Nora made some new friends also.
We were able to play, chat, decorate and eat a delicious lunch. Thanks, Aunt Ginger. You know how to make lots of little ones (and their mamas) very happy!
And last night after supper, her daddy took pity on her and cleaned up this "walker" toy. It's been out in the back getting drenched with rain and covered in mud ever since Caroline stopped using it to walk around the house. That means it has mud and rain from two different states and several different cities on it :) Nora is thrilled to have a new toy she can use to practice her new trick--pulling up to standing. She also loves to stand on couches, Caroline's kitchen set, low tables, human legs and stairs. Oih! This means a whole scary new phase of life is starting.

Saturday, December 4, 2010

DIY Holidays Project Two: Wreaths

Next Up: Wreaths! I've been really excited about making wreaths and garland this year.

Step One: Gather a grocery bag of greens from your backyard (or from someone who has greens in their yard). We inherited a gorgeous blue spruce in our new backyard. I think that was my entire inspiration for making my own wreath this year. Blue spruce happens to hurt your hands a fair amount, I found out.

Step Two: Find a nice place to work and gather all your supplies. Needed: the grocery bag of greens, either a wreath frame or a wire coat hanger for bending into a frame, florist wire/paddle wire (got this for $1.99 at Michael's), a wire cutter, any embellishments you'd like for your wreath. I chose a clip on fake poinsettia and some soft colored Christmas tree ornaments.

Step Three: If you choose to use the coat hanger, you'll need to unbend it from it's hanger form and bend it into a circle. This proved to be the hardest part for me. I used pliers to bend the ends and hook them together to complete the circle.

Step Four: Attach (wrap around the form several times) the paddle wire to the frame.

Step Five: Grab a handful of branches cut into about 6 inch lengths. Use the paddle wire to wrap around the top of the branches several times to attach the branches to the form. Try to pull the wire tight so that the wreath is secure. Repeat this procedure again and again (and again) all round the circle. The closer together you bind the greenery, the fuller the wreath will look. Also, if you bought a form instead of using a coat hanger, your wreath will naturally be fuller since the frame has more than one wire going around. Keep your branches all facing the same direction.

Step Six: After you've finished attaching your greenery, cut the wire and wrap the leftover around the wreath tightly several times.

Step Seven: Lay the wreath on the table and survey to find any bare spots: fill those spots in with more greenery, either the same kind you used before, or a different kind of leaf to add some depth.
Step Eight: Garnish the wreath. I clipped my poinsettia on and then strung the 4 Christmas tree ornaments onto a length of paddle wire, then I wrapped both ends of the paddle wire tightly around the wreath. I used soft pinks, purples, silvers and white for my embellishments because the color of the blue spruce seemed to lend itself more to softness.

Step Nine: Ad a bow to the top if you'd like. You can use the bow/ribbon to hang the wreath if you'd like. Our door already has a hook on it, so I skipped the ribbon. Also, I had bought bright red ribbon at Costco and it didn't match the embellishments I ended up picking.
Time Investment: This project took about half an hour once I had gathered all the supplies. I gathered the greens a couple days ahead of time from my own backyard and that only took me another ten minutes.

I am mostly happy with the results of my wreath. It cost me $1.99 for the whole spool of paddle wire, and I did not use very much of it. The embellishments cost $6 and I can save them to use again another year. I used a coat hanger from my closet. I think it would have cost me around $35 to buy this wreath. I wish that it was a little bigger and a little fuller. But next time around I'll do better. I think next year I'll invest in a frame and then it will be easier to make it fuller. And I can save the frame and use it from year to year.

Here's our little helper. While the rest of the family worked together to make multi-grain waffles with pecans and chocolate chips this morning, she emptied out as many cupboards as she could and climbed in.
Happy Holidays and Happy Wreath Making!

Do It Yourself Holidays: Stockings

This blog is updated for the express purpose of two sets of Grandparents getting to see pictures of their grandkids and getting a little glimpse of what those goons are up to. But I also like to blog project and craft ideas occasionally. Those occasions have gone few and quite far between since Nora came along. But during this holiday season I'd like to get back to that theme of things. Don't worry grandparents, my little helpers will still get plenty of air time. I'm not promising to have a set number of projects, or a certain number each week or anything--this is just as I have the time : )


Project Number One: Stockings

Our new house has two wood burning fire places. Naturally, we need some pretty stockings to decorate the one that we are currently not using for fires. Stockings on the "used for fires fire place" is too much of a hazard for me. We do not believe in Santa 'round these parts and I'm pretty hit and miss with filling the stockings. I do often pick up a thing or two at the Target dollar spot to put in the socks. Point being, we don't need big stockings with lots of room. We like to make our stockings out of scrapbooking paper. I bought a book of it on clearance about 3 years ago at Michael's and it will take me years to use it up. Opening it up to pick stocking makings is like going to a designer fabric store and picking my faves for only pennies. You could use felt or even flannel for this particular method, if you wanted them to be sturdier, larger or hold more.

Step One: Trace the pattern of a stocking onto the paper. Use two pieces if you'd like the stocking to match front and back. If not, just use some colored construction paper for the backs. No one will know. I use an old stocking for my pattern.


Step Two: Cut out the stockings (remember to have the same patterns face front and back so that the fancy side of the paper or fabric faces outward).

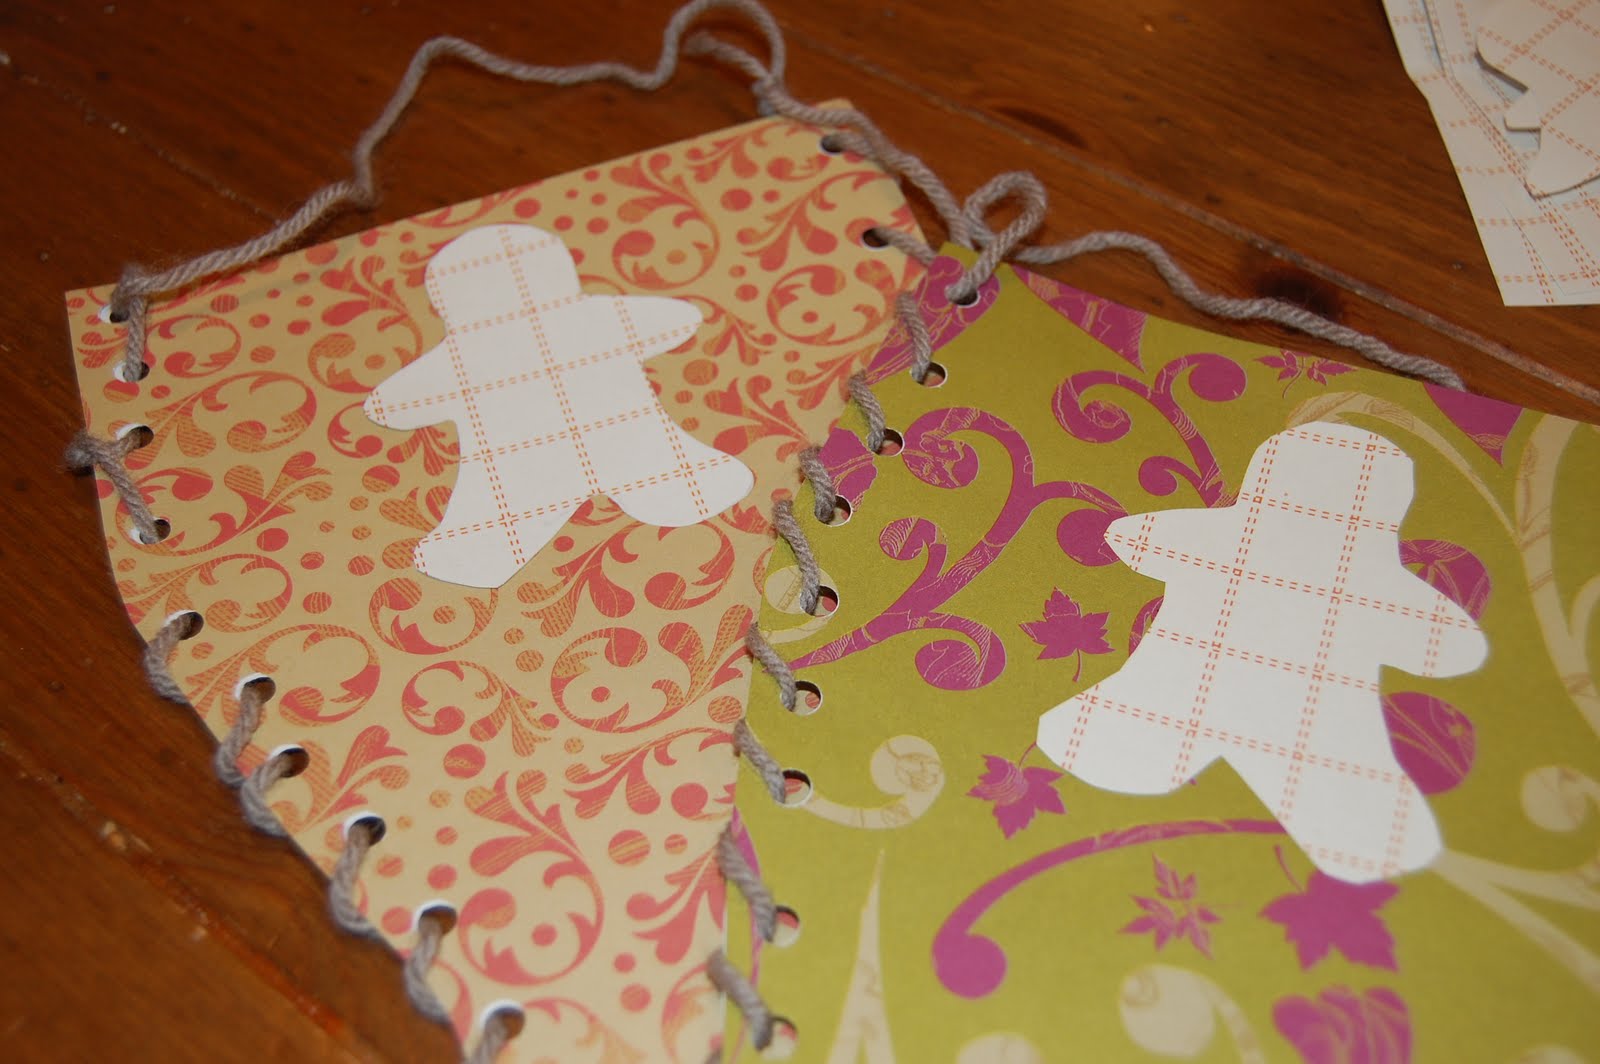
Step Three: Using a hole punch, punch holes around the outside of the stocking. You can measure and make them evenly spaced if you'd like. I just punch away and so they are unevenly spaced on mine.

Step Four: Match up fronts of backs of stockings and find some helpers.

Step Five: Cut some lengths of yarn. Either thread a large plastic needle or wrap scotch tape around one end of the yarn. The tape makes the thread hard for threading through the holes in the stocking. *


Step Six: Sew your stockings. We used a blanket stitch for ours. It's an easy stitch for the kids to remember. Tie the thread to make a hanging hoop at the top of the stocking after you finish sewing.


Step Seven: is optional. Cut out a shape from some other paper/fabric. We used the shape of a gingerbread man. Paste it to the front of the stocking. Write names on the shape so that the stockings are claimed.
Step Eight: Hang from a mantel or on the wall.
*I am looking for large plastic needles so that my kids can practice with a needle when we do yarn "sewing" projects like this. I searched all over Michael's and they said they don't have any. Does anyone know where I can find some?

Monday, November 29, 2010

Uncles Make Great Friends

We finished up with a fantastic Thanksgiving Holiday and are attempting to rejoin normal life. It's always the best feeling when Daddy comes home from work and we have multiple days of having him home with us to look forward to. Last Wednesday night was no exception. The only downside was that Ezra was laying on the couch lethargic with a 102 fever. Thankfully the fever went down by morning and we were able to head over the river and through the woods for the feast. Of course, I didn't get any pictures. But we still had good food and good fun.
That night we went home to the Tractor's house to spend a couple of nights and days with the grandparents and the two uncles who were home on college break.
And let me tell you, uncles are a lot of fun to small children. Especially uncles who have no children or wives to attend to : )
Grandma bought a gingerbread house kit and let Brett and Jeff put it together with the kids.
This one would eat all the candy, given the opportunity.

This one might too!
And this one just explored all the opportunities on the floor around and under the table.
Good thing we have an engineer (in his final year of schooling) and a pre-med student to handle the finer details of gingerbread housing.

Finished product.
Time to relax and watch some football. How 'bout that Boise State game?
Nora really likes her uncle Heff. She even kind of looks like him. Recently I was looking at a picture of Jeff as a baby and realized how much both Ezra and Nora look like him--those big eyes in a little baby face (not that he has a baby face now, just back then : ) ). She will put her arms out and reach for Uncle Jeff hoping that he'll take her. He usually does...and then she rewards him with this,
Yep, she's biting his nose off--her favorite trick.

These two pictures highlight daddy and his look alike boy.

Grandpa and Grandma bought some beautiful dress clothes for the kiddos and we took them into a studio to have their pictures taken on Saturday. I didn't buy the CD and the rights to the photos, so I can't put them here on my blog--but here is Ezra practicing his smile before we left for the mall.
Now we are left with the memories (in our heads and on MY hips!) of a wonderful time.